玩玩Clang

0x01 配置

  Clang是LLVM的编译前端,我们的OC、Swift通过Clang经过预处理、词语分析、语法分析,最后生成IR中间码后,交由LLVM进行优化,最后针对不同的平台将IR转换成对应平台的汇编代码。

  本篇需要对Clang进行一些定制化,所以我们需要重新编译llvm,步骤如下:

  参考链接:http://llvm.org/docs/CMake.html,编译完所有的工具都在编译目录下的bin目录下。

0x02 试玩

  我们有代码如下

1
2
3
4
5
6
7
8
9
10
11
12
#import <UIKit/UIKit.h>
#import "AppDelegate.h"
#import "Animal.h"

#define NUM_1 100
#define NUM_2 200


int main(int argc, char * argv[]) {
int a = NUM_1 + NUM_2;
return 0;
}

预处理

  经过预处理后的代码会是什么样的?使用Clang命令如下

clang -E main.m

1
2
3
4
5
6
7
8
9
# 1 "/Applications/Xcode.app/Contents/Developer/Platforms/MacOSX.platform/Developer/SDKs/MacOSX10.13.sdk/System/Library/Frameworks/Foundation.framework/Headers/FoundationLegacySwiftCompatibility.h" 1 3
# 185 "/Applications/Xcode.app/Contents/Developer/Platforms/MacOSX.platform/Developer/SDKs/MacOSX10.13.sdk/System/Library/Frameworks/Foundation.framework/Headers/Foundation.h" 2 3
# 10 "./Animal.h" 2

int main(int argc, char * argv[]) {
int a = 100 + 200;

return 0;
}

  预处理的过程中,导入了头文件,并把宏替换了。

词法分析

  词法分析的命令

clang -fsyntax-only -Xclang -dump-tokens main.m

1
2
3
4
5
6
7
8
9
10
11
12
13
14
15
16
17
18
19
20
21
22
23
24
25
26
27
28
29
30
31
32
int 'int'	 [StartOfLine]	Loc=<main.m:17:1>
identifier 'main' [LeadingSpace] Loc=<main.m:17:5>
l_paren '(' Loc=<main.m:17:9>
int 'int' Loc=<main.m:17:10>
identifier 'argc' [LeadingSpace] Loc=<main.m:17:14>
comma ',' Loc=<main.m:17:18>
char 'char' [LeadingSpace] Loc=<main.m:17:20>
star '*' [LeadingSpace] Loc=<main.m:17:25>
identifier 'argv' [LeadingSpace] Loc=<main.m:17:27>
l_square '[' Loc=<main.m:17:31>
r_square ']' Loc=<main.m:17:32>
r_paren ')' Loc=<main.m:17:33>
l_brace '{' [LeadingSpace] Loc=<main.m:17:35>
int 'int' [StartOfLine] [LeadingSpace] Loc=<main.m:18:5>
identifier 'a' [LeadingSpace] Loc=<main.m:18:9>
equal '=' [LeadingSpace] Loc=<main.m:18:11>
numeric_constant '100' [LeadingSpace] Loc=<main.m:18:13 <Spelling=main.m:13:16>>
plus '+' [LeadingSpace] Loc=<main.m:18:19>
numeric_constant '200' [LeadingSpace] Loc=<main.m:18:21 <Spelling=main.m:14:16>>
semi ';' Loc=<main.m:18:26>
int 'int' [StartOfLine] [LeadingSpace] Loc=<main.m:19:5>
identifier 'b' [LeadingSpace] Loc=<main.m:19:9>
equal '=' [LeadingSpace] Loc=<main.m:19:11>
numeric_constant '1' [LeadingSpace] Loc=<main.m:19:13>
plus '+' [LeadingSpace] Loc=<main.m:19:15>
numeric_constant '2' [LeadingSpace] Loc=<main.m:19:17>
semi ';' Loc=<main.m:19:18>
return 'return' [StartOfLine] [LeadingSpace] Loc=<main.m:21:5>
numeric_constant '0' [LeadingSpace] Loc=<main.m:21:12>
semi ';' Loc=<main.m:21:13>
r_brace '}' [StartOfLine] Loc=<main.m:25:1>
eof '' Loc=<main.m:25:2>

语法分析

  语法分析命令如下

clang -fsyntax-only -Xclang -ast-dump main.m

1
2
3
4
5
6
7
8
9
10
11
12
13
14
15
16
-FunctionDecl 0x7ff34f2eeae8 <main.m:17:1, line:25:1> line:17:5 main 'int (int, char **)'
|-ParmVarDecl 0x7ff34f2ee918 <col:10, col:14> col:14 argc 'int'
|-ParmVarDecl 0x7ff34f2ee9d0 <col:20, col:32> col:27 argv 'char **':'char **'
`-CompoundStmt 0x7ff34f2eedb8 <col:35, line:25:1>
|-DeclStmt 0x7ff34f2eec70 <line:18:5, col:26>
| `-VarDecl 0x7ff34f2eeba8 <col:5, line:14:16> line:18:9 a 'int' cinit
| `-BinaryOperator 0x7ff34f2eec48 <line:13:16, line:14:16> 'int' '+'
| |-IntegerLiteral 0x7ff34f2eec08 <line:13:16> 'int' 100
| `-IntegerLiteral 0x7ff34f2eec28 <line:14:16> 'int' 200
|-DeclStmt 0x7ff34f2eed68 <line:19:5, col:18>
| `-VarDecl 0x7ff34f2eeca0 <col:5, col:17> col:9 b 'int' cinit
| `-BinaryOperator 0x7ff34f2eed40 <col:13, col:17> 'int' '+'
| |-IntegerLiteral 0x7ff34f2eed00 <col:13> 'int' 1
| `-IntegerLiteral 0x7ff34f2eed20 <col:17> 'int' 2
`-ReturnStmt 0x7ff34f2eeda0 <line:21:5, col:12>
`-IntegerLiteral 0x7ff34f2eed80 <col:12> 'int' 0

生成IR

  IR是作为Clang的输出,llvm的输入,命令如下

clang -S -fobjc-arc -emit-llvm main.m -o main.ll

1
2
3
4
5
6
7
8
9
10
11
12
13
14
15
16
17
18
19
20
21
22
23
24
25
26
27
28
29
30
31
32
33
; ModuleID = 'main.m'
source_filename = "main.m"
target datalayout = "e-m:o-i64:64-f80:128-n8:16:32:64-S128"
target triple = "x86_64-apple-macosx10.13.0"

; Function Attrs: noinline nounwind optnone ssp uwtable
define i32 @main(i32, i8**) #0 {
%3 = alloca i32, align 4
%4 = alloca i32, align 4
%5 = alloca i8**, align 8
%6 = alloca i32, align 4
%7 = alloca i32, align 4
store i32 0, i32* %3, align 4
store i32 %0, i32* %4, align 4
store i8** %1, i8*** %5, align 8
store i32 300, i32* %6, align 4
store i32 3, i32* %7, align 4
ret i32 0
}

attributes #0 = { noinline nounwind optnone ssp uwtable "correctly-rounded-divide-sqrt-fp-math"="false" "disable-tail-calls"="false" "less-precise-fpmad"="false" "no-frame-pointer-elim"="true" "no-frame-pointer-elim-non-leaf" "no-infs-fp-math"="false" "no-jump-tables"="false" "no-nans-fp-math"="false" "no-signed-zeros-fp-math"="false" "no-trapping-math"="false" "stack-protector-buffer-size"="8" "target-cpu"="penryn" "target-features"="+cx16,+fxsr,+mmx,+sse,+sse2,+sse3,+sse4.1,+ssse3,+x87" "unsafe-fp-math"="false" "use-soft-float"="false" }

!llvm.module.flags = !{!0, !1, !2, !3, !4, !5, !6}
!llvm.ident = !{!7}

!0 = !{i32 1, !"Objective-C Version", i32 2}
!1 = !{i32 1, !"Objective-C Image Info Version", i32 0}
!2 = !{i32 1, !"Objective-C Image Info Section", !"__DATA,__objc_imageinfo,regular,no_dead_strip"}
!3 = !{i32 4, !"Objective-C Garbage Collection", i32 0}
!4 = !{i32 1, !"Objective-C Class Properties", i32 64}
!5 = !{i32 1, !"wchar_size", i32 4}
!6 = !{i32 7, !"PIC Level", i32 2}
!7 = !{!"Apple LLVM version 9.1.0 (clang-902.0.39.2)"}

其他

  • 生成字节码

    clang -emit-llvm -c main.m -o main.bc

  • 生成汇编

    clang -S -fobjc-arc main.m -o main.s

  • 生成目标文件

    clang -fmodules -c main.m -o main.o

  • 生成可执行文件

    clang main.o -o main

0x03 第一个插件

初始化一个插件项目

  打开源码路径llvm/tools/clang/example,example目录下新建目录,此例中为DemoPlugin。

  接着,修改example目录的CMakeLists.txt文件,添加如下:

1
add_subdirectory(DemoPlugin)

  来到testPlugin目录,新建如下三个文件

  • CMakeLists.txt
  • DemoPlugin.exports
  • DemoPlugin.cpp

  其中CMakeLists.txt内容如下,可以参考example目录下其他例子的CMakeLists.txt内容。

1
2
3
4
5
6
7
8
9
10
11
12
13
14
15
16
17
18
19
20
# If we don't need RTTI or EH, there's no reason to export anything
# from the plugin.
if( NOT MSVC )
if( NOT LLVM_REQUIRES_RTTI )
if( NOT LLVM_REQUIRES_EH )
set(LLVM_EXPORTED_SYMBOL_FILE ${CMAKE_CURRENT_SOURCE_DIR}/DemoPlugin.exports)
endif()
endif()
endif()

add_llvm_loadable_module(DemoPlugin DemoPlugin.cpp PLUGIN_TOOL clang)

if(LLVM_ENABLE_PLUGINS AND (WIN32 OR CYGWIN))
target_link_libraries(DemoPlugin PRIVATE
clangAST
clangBasic
clangFrontend
LLVMSupport
)
endif()

  然后开始最重要的testPlugin.cpp代码编写,

1
2
3
4
5
6
7
8
9
10
11
12
13
14
15
16
17
18
19
20
21
22
23
24
25
26
27
28
29
30
31
32
33
34
35
36
37
38
39
40
41
42
43
44
#include "clang/Frontend/FrontendPluginRegistry.h"
#include "clang/AST/AST.h"
#include "clang/AST/ASTConsumer.h"
#include "clang/Frontend/CompilerInstance.h"

using namespace clang;

namespace
{
class DemoPluginConsumer : public ASTConsumer
{
CompilerInstance &Instance;
std::set<std::string> ParsedTemplates;
public:
DemoPluginConsumer(CompilerInstance &Instance,
std::set<std::string> ParsedTemplates)
: Instance(Instance), ParsedTemplates(ParsedTemplates) {}
};

class DemoPluginASTAction : public PluginASTAction
{
std::set<std::string> ParsedTemplates;
protected:
std::unique_ptr<ASTConsumer> CreateASTConsumer(CompilerInstance &CI,
llvm::StringRef) override
{
return llvm::make_unique<DemoPluginConsumer>(CI, ParsedTemplates);
}
// 插件的入口函数
bool ParseArgs(const CompilerInstance &CI,
const std::vector<std::string> &args) override {

DiagnosticsEngine &D = CI.getDiagnostics();
// Report的作用是向编译器报错
D.Report(D.getCustomDiagID(DiagnosticsEngine::Error,
"Hello Plugin"));

return true;
}
};
}

static clang::FrontendPluginRegistry::Add<DemoPluginASTAction>
X("DemoPlugin", "demo plugin");

  编译,在我们的之前编译源码时新建的目录

  • cmake

    • cmake llvm源代码目录
    • cmake –build .
    • make DemoPlugin
    • 插件出现在lib目录下,DemoPlugin.dylib
  • Xcode

    • cmake -G Xcode .llvm源代码目录 -DCMAKE_BUILD_TYPE:STRING=MinSizeRel
    • 打开LLVM.xcodeproj
    • 选择Automatically Create Schemes
    • 编译clang、DemoPlugin
    • 插件出现在Debug/lib目录下,DemoPlugin.dylib

配置Xcode

  Xcode的Build Setting里的Other C Flags添加如下,也就是DemoPlugin.dylib所在目录

-Xclang -load -Xclang /Users/ex-lifenglei/Desktop/llvm/myBuild/lib/DemoPlugin.dylib -Xclang -add-plugin -Xclang DemoPlugin

Build_Setting

  这时,我们build下我们的项目大多数会遇到下面的报错

Build_Error

  这是因为Xcode的Clang版本跟我们自己编译的Clang版本不一致。Clang插件需要对应的Clang版本来加载。所以我们还得修改Xcode指定的Clang。在Xcode的Build Setting里新增两个自定义项。

CC = /Users/ex-lifenglei/Desktop/llvm/myBuild/bin/clang-7

CXX = /Users/ex-lifenglei/Desktop/llvm/myBuild/bin/clang-7

Build_Setting

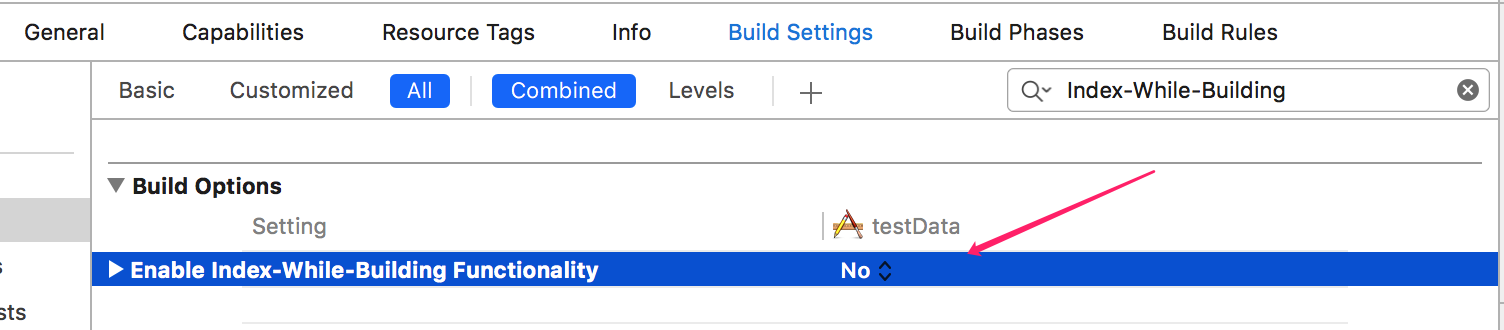
  然而在Xcode 9版本上,继续报错了,如下

Build_Error

  解决办法就是关掉Build Setting里的Index-While-Building

Build_Setting

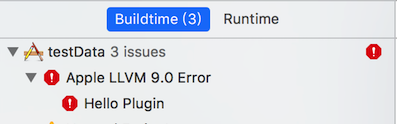
  紧接着再次编译,我们成功编译失败,那是当然的,我们本来就设置了一个编译错误提示,说明我们的插件成功运行了!!!

Build_Success

  但是,因为这里是error,所以编译终止了,如果上面代码改成Warning让代码继续执行下去的话,可能会遇到下面这个错误

Build_Error

  解决方法就是把Xcode程序下的libarclite_iphonesimulator拷贝到编译目录下的../lib/arc下。如果是真机,也是同样的方法把libarclite_iphoneos.a复制过来。

/Applications/Xcode.app/Contents/Developer/Toolchains/XcodeDefault.xctoolchain/usr/lib/arc/libarclite_iphonesimulator.a

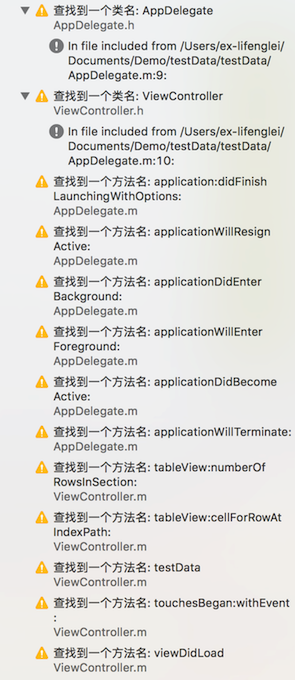
  我们再做个试验,我们把所有的类名和方法给打出来,代码如下

1
2
3
4
5
6
7
8
9
10
11
12
13
14
15
16
17
18
19
20
21
22
23
24
25
26
27
28
29
30
31
32
33
34
35
36
37
38
39
40
41
42
43
44
45
46
47
48
49
50
51
52
53
54
55
56
57
58
59
60
61
62
63
64
65
66
67
68
69
70
71
72
73
74
75
76
77
78
79
80
81
82
83
84
85
86
87
88
89
90
91
92
93
94
95
96
97
98
99
100
101
102
103
104
105
#include "clang/Frontend/FrontendPluginRegistry.h"
#include "clang/AST/AST.h"
#include "clang/AST/ASTConsumer.h"
#include "clang/AST/RecursiveASTVisitor.h"
#include "clang/Frontend/CompilerInstance.h"

using namespace clang;

namespace
{
// 可以深度优先搜索整个AST,并访问每一个基类,遍历需要处理的节点
class DemoPluginVisitor : public RecursiveASTVisitor<DemoPluginVisitor>
{
private:
CompilerInstance &Instance;
ASTContext *Context;

public:
void setASTContext (ASTContext &context)
{
this -> Context = &context;
}

DemoPluginVisitor (CompilerInstance &Instance)
:Instance(Instance) {}

// 查找类名
bool VisitObjCInterfaceDecl(ObjCInterfaceDecl *declaration) {
if(isUserSourceCode(declaration)) {
DiagnosticsEngine &D = Instance.getDiagnostics();
unsigned diagID = D.getCustomDiagID(DiagnosticsEngine::Warning, "查找到一个类名: %0");
D.Report(declaration->getLocStart(), diagID) << declaration->getName();
}
return true;
}

// 查找方法名
bool VisitObjCMethodDecl(ObjCMethodDecl *declaration) {
if(isUserSourceCode(declaration)) {
DiagnosticsEngine &D = Instance.getDiagnostics();
unsigned diagID = D.getCustomDiagID(DiagnosticsEngine::Warning, "查找到一个方法名: %0");
// D.Report(declaration->getLocStart(), diagID).AddString(declaration->getSelector().getAsString());
D.Report(declaration->getLocStart(), diagID) << declaration->getSelector().getAsString();
}
return true;
}

// 是否用户代码
bool isUserSourceCode (Decl *decl){
std::string filename = Instance.getSourceManager().getFilename(decl->getSourceRange().getBegin()).str();

if (filename.empty())
return false;
// 定义非Xcode中的源码都是用户源码
if(filename.find("/Applications/Xcode.app/") == 0)
return false;

return true;
}
};

class DemoPluginConsumer : public ASTConsumer
{
private:
DemoPluginVisitor visitor;
CompilerInstance &Instance;
std::set<std::string> ParsedTemplates;
public:
DemoPluginConsumer(CompilerInstance &Instance,
std::set<std::string> ParsedTemplates)
: Instance(Instance), ParsedTemplates(ParsedTemplates), visitor(Instance) {}

// 每次分析到一个顶层定义时会回调此函数,返回true表示处理
bool HandleTopLevelDecl(DeclGroupRef DG) override
{
return true;
}

// ASTConsumer的入口函数
void HandleTranslationUnit(ASTContext& context) override
{
visitor.setASTContext(context);
visitor.TraverseDecl(context.getTranslationUnitDecl());
}
};

class DemoPluginASTAction : public PluginASTAction
{
std::set<std::string> ParsedTemplates;
protected:
std::unique_ptr<ASTConsumer> CreateASTConsumer(CompilerInstance &CI,
llvm::StringRef) override
{
return llvm::make_unique<DemoPluginConsumer>(CI, ParsedTemplates);
}
// 插件的入口函数
bool ParseArgs(const CompilerInstance &CI,
const std::vector<std::string> &args) override {
return true;
}
};
}

static clang::FrontendPluginRegistry::Add<DemoPluginASTAction>
X("DemoPlugin", "demo plugin");

  运行结果如下,我们所有的类名和方法名都被打出来了。

Build_Demo

  更多文档查看:https://clang.llvm.org/doxygen/namespaceclang.html